Crafts on cardboard from natural material. What can be made from natural material? Crafts from natural materials
From time to time, we all want to do something with our own hands, create beauty and share this achievement with the world. Making crafts from natural materials can be classified precisely in this category of hobbies. Working with natural material not only soothes, helps to escape from the everyday hustle and bustle, but it can also become a profitable business.
Making a variety of crafts from natural materials is a great hobby not only for adults, but also for kids, who will get a lot of positive emotions from the process. A beautiful craft will be a great gift or a good addition to the interior, because hand-made products are valued much more than similar items from the store.
DIY crafts from natural material: master classes
In order to learn something, it is absolutely not necessary to go to courses or study manuals on your own. It is enough to visit master classes of specialists or watch training videos where you can learn all the nuances of working with natural materials. The craftsmen will not only lead an excursion into the specifics of manufacturing, but also talk about what materials and tools will be needed in the process. There is a separate master class for almost every question that may cause a beginner to doubt. Here you can see not only the specifics of making crafts, but also learn the secrets of professionals.

wood crafts
Wood is a beautiful and malleable material that anyone can learn to work with. It's best to start with small things: photo frames, caskets etc. However, a beginner may be faced with the fact that it will be necessary to purchase special tools. The specifics of the equipment directly depends on what you are going to create.

To create a wooden box, we first need to make blank stencil. The stencil can be of any shape and size. To do this, we draw a drawing, where we indicate the parameters of each detail of the future craft. In order for the space between the lid and the sidewalls to be even, it is better to glue a single whole from the blanks, and then evenly separate the upper part from the lower one.

For work we need such tools, how:
- clamps for gluing boards;
- jigsaw;
- ruler;
- grinding skins;
- glue;
- brushes for applying glue.

It is best to use soft woods - pine, alder or linden. There should be no cracks, chips or knots on the wood. When assembling the box, it is better to take wood glue, ideal for working with wood.
- We transfer plank drawing. To do this, it is best to use a ruler and a simple pencil.
- After you can safely cut details jigsaw. The walls of the future box should be of the same thickness (about 1 cm).
- Necessary polish all the details with sandpaper, after which we adjust the joints.
- Now you can safely proceed to bonding parts. Here we use a clamp, because this way the glue will better hold the parts of the box together.
- The resulting details fasten wood glue, clamp in a clamp until completely dry.
- After drying, you can fasten the lid and the main part of the box with beautiful loops, which are sold in specialized stores.
- On request, the box can varnish or decorate with fittings (legs, corners, handles).

stone crafts
A huge number of interesting things can be made from natural stone: from a beautiful decoration to an original rug. It all depends on what kind of stone you are going to use in your work.

To create beautiful rugs in the bathroom you can use ordinary pebbles. As a basis, we will take a rubber bath mat of the desired diameter.
- We take a few kilograms of pebbles. It is better to take 5-6 kilograms at once.
- For gluing, we use a universal polymer glue, which can be bought at any hardware store. We will also need yacht varnish.
- Select a pattern and turn the rug over. We transfer picture onto the surface of the rug. For these purposes, we use a marker.
- We wet our hands in water and place the pebbles on the resulting pattern in the desired order until the desired pattern is formed. Then one by one glue the stones to the rug.
- Carefully blot the joints with a brush so that there are no voids.
- We make from tape formwork". We cover the rug several times with varnish. Let the product dry on the back.


That's all! A beautiful pebble rug is ready!
Leaves and flowers appliqués
Bright, colorful leaves and flowers delight us every season, however, they are able to give others positive emotions all year round. Leaves and flowers can be used to make beautiful appliqués that adorn jewelry boxes with dignity, create a colorful ornament on the countertop, or conduct a personal design experiment. From flowers and leaves whole paintings and panel, which will then take their place of honor in your home. For work, dry leaves, herbs and flowers are used.

The surface of the material must be perfectly flat, so for drying leaves or flowers are laid between the dense pages of books for several weeks. After drying, you can start working. For gluing applications to the surface of the paper is used PVA glue, any special tools are most often not needed.

- First, on a sheet of thick paper, we lay out the leaves and flowers in the right order, forming a pattern.
- If necessary, trim leafy or floral material to create a symmetrical shape.
- We fix the result with glue.

DIY shell decor
Beautiful seashells from the beach may well become an interesting decor element in the interior of your home. Such a craft will not only bring originality to the decor of the room, but also remind you of the fabulous days of relaxation on the banks of a river or sea. You will need glue and a finished product, which we will decorate with shells. It may be ordinary Frame, picture frame, lamp and much more.

When working, you can use shells of different sizes. A large shell will turn into an unusual one in a matter of minutes. vase, soap holder or vase for decoration. A sink of a suitable size is ideal for the role of a lampshade, small shells can be used as candlesticks. It is enough to show imagination and ordinary things will turn into real works of art.

Take the blank and glue the shells on its surface in the right order.

Feather crafts
Feathers are a rather unusual material that usually does not require any additional equipment to work with. However, the product may simply crumble if the pen base is not firmly fastened and fixed in one position.

To create beautiful feather Christmas trees we will need:
- white paint;
- cardboard paper;
- feathers of any color;
- glue;
- brushes;
- small beads.

For work, it is worth purchasing several sets of feathers. The kits sell nibs with a particular curve that we need and a certain size. You can take feathers of different colors or make a plain Christmas tree.
- We make from cardboard cone- this is a form of future crafts.
- Glue the feathers to the cone, starting from the bottom edge. You can use a hot gun or PVA glue. Glue should be applied with a brush to the base of each pen and glue the blank to the cardboard.
- After completing the work, you can glue it to each pen for beauty. bead.

DIY crafts from natural material: video
In order to create a cozy atmosphere in your home, every detail designed to decorate the interior must clearly fit into its overall style. To emphasize the dignity of the interior, highlighting the advantages and hiding the disadvantages, the decorative sound of various accessories will help. One of these creations of home art is handmade crafts made from natural materials. From our article you will learn how with the help of simple things that surround us, you can create exquisite jewelry and original decor items. The following workshops with photos and step-by-step instructions, as well as various ideas for home, summer cottage, school and kindergarten, will help you easily cope with this task.
Beautiful crafts: we do it quickly and easily (photo)
Kanzashi, topiary, decoupage, planters, origami - the world of handmade tirelessly excites the imagination of needlewomen.
A variety of crafts made of wood, glass, shells, cereals, coffee beans, pasta, paper, stones, pebbles and other natural materials will help create a unique comfort and light romantic mood in any interior.
Advice! You can create a variety of stocks for making crafts from natural material from absolutely anything, just look around, you probably have a lot of things suitable for this at home.


Hazel and pine nuts, beans, buckwheat, peas, coriander, pepper - are excellent material for creativity

Advice! So that handicraft creativity gives you exclusively positive emotions, and the process of preparing material turns into a real holiday, you can combine business with pleasure.
- Being at sea in the summer, stock up on beautiful shells and small pebbles. They make great wall decorations for the home.
- Walking through the autumn park, give your child the task of picking up acorns, chestnuts, colorful fallen leaves. Products from natural materials made by children's hands are endowed with special warmth and love.
- When caring for your own garden, do not be too lazy to sow the seeds of dried flowers. They are perfectly stored in the winter and will be an ideal tool for creative work.

Natural wood crafts
Wood- a beautiful and malleable material that has gained popularity among designers, architects and ordinary amateurs. Natural array is easy to combine with metal, glass, plastic and stone decor.
Wooden crafts will harmoniously fit into a cozy country-style room, set the tone for the brutal loft style, and advantageously change the classic, Scandinavian, minimalist decor.


We offer you to view a universal selection of interesting wood products that can transform the design of any interior, becoming its beautiful and bright accent:
Tree branches
- a refined natural material that allows you to create many original things for your home with your own hands: chandeliers, wall lamps, candlesticks, photo frames, hangers, headboards and much more.
- Painted dry branches with many branches will give a special charm to the living room, kitchen, bathroom.
- Tables, lamps, shelves, vases trimmed with a saw cut look nice.
- A romantic mood will be set by decorative panels in the form of a heart, a bird, a star.
- Gold, silver, white, black rods, placed in a transparent vase with stones, attract attention.


Wood saw cuts
Tree cuts help create larger crafts: vases, clocks, frames, stylized wreaths. Wooden tubs for flowers, shelves, hot coasters will harmoniously fit into the interior.
Having shown a little imagination, it will not be difficult for craftsmen to build an unusual countertop from these round ones, fixing the saw cuts of wood on a plywood sheet, filling the voids with shavings and opening them with varnish.


Tree bark
Bark is a natural and affordable material. Modern craftsmen use birch bark to create unique paintings and appliqués. Mugs, baskets, tuesas and boxes made of birch bark will last for decades.
Crafts made from natural materials will help not only to reveal your creative potential, but also to translate your interior ideas into reality.


Decorative stone and pebbles
- Decorative rock- the unbridled power of the elements, which has a strong charge, which affects the overall design concept of personal plots, interior decoration.
Chests, caskets, vases filled with pebbles will dilute the routine atmosphere of city apartments and office space. Small stones will decorate walls, mirrors, door handles, stands for installations, as well as bottles. Look at the examples in the photo.

An interesting solution would be glass bottle candle holder filled with shells with colorful pebbles. No less beautiful will look beautiful stones stuck to the wall.
A decorative rug, pasted over with flat pebbles, planted on silicone or special glue, looks unusual and elegant. With it, your porch will look stylish and beautiful.
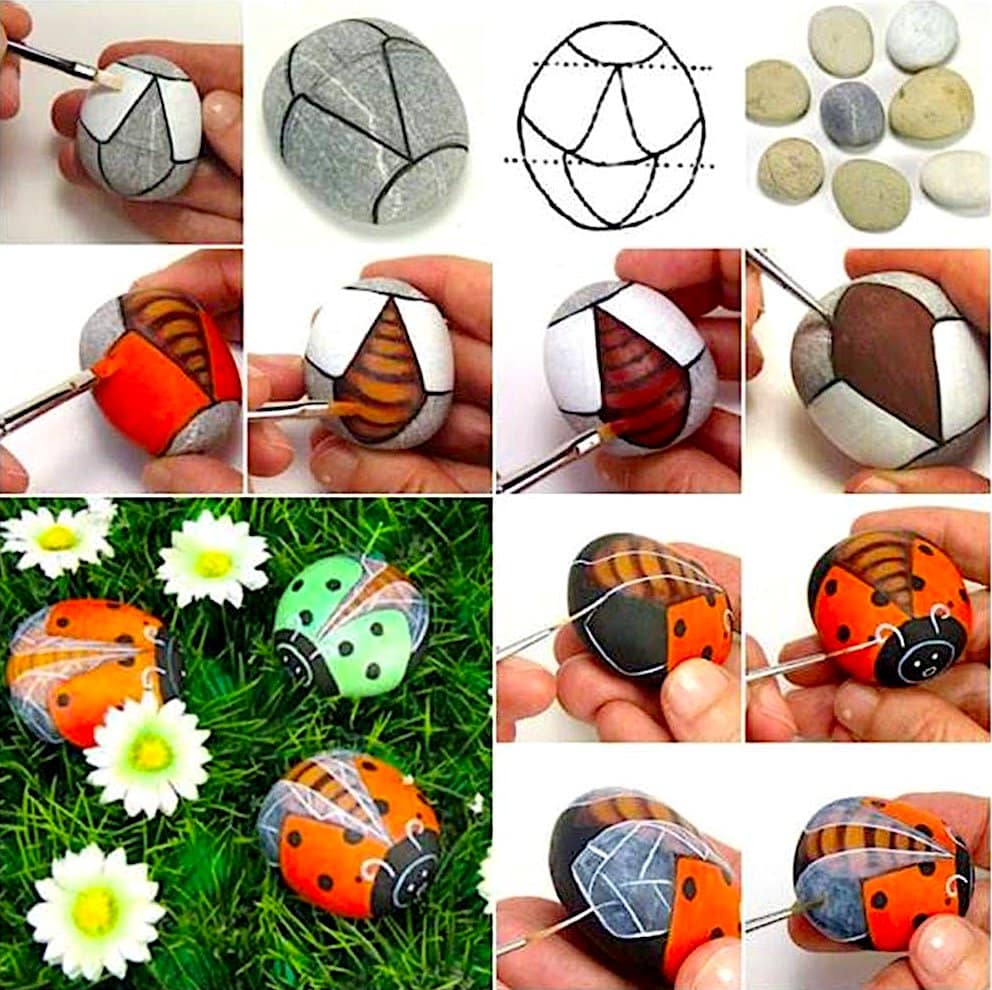
Even children can create original stone compositions. Just before that, you need to conduct a step-by-step master class for them.


Mosaic, painting, stone cutting- a great way to entertain children by creating magnets, flower arrangements, trees, cacti in decorated pots.
Advice! It is best to paint sea pebbles in one tone with the help of special cans, but you need to apply drawings and thin lines on them using brush liners.


- Decorative panels and figurines are made from multi-colored stones. Pebble cladding of walls, floors, fireplaces and window sills - the basis, kitchens, toilets.

Picture of stones - a unique piece of furniture

Summer crafts from fruits, leaves and flowers
The formation of a careful and caring attitude towards the environment is formed by classes with natural materials. An important stage of work is the collection, processing and preparation for the use of summer gifts.
You can make beautiful and original home accessories with children's hands from:
- leaves;
- poplar fluff;
- colors;
- seeds.
Dry grass, fruits, flowers, tree fruits and plant seeds make it possible to create complex volumetric applications for autumn and summer themes, unique and colorful compositions and other original art objects.


Advice! If wood (saw cuts, logs, bark, twigs) is used to create crafts from natural material, it should be thoroughly dried before starting work. Using damp wood will significantly shorten the life of homemade masterpieces.
Ideas for creating autumn crafts
Autumn is the best time to pick fruits, seeds, vegetables, as well as acorns, cones, and chestnuts. Fallen leaves, dry flowers, grass will serve to create unusual bouquets, wreaths, applications.


Natural compositions look good in ordinary vases, watermelon peel, coconut shell, pumpkin shell. An original master class can be held for children, teaching them how to create crafts from natural materials with their own hands.
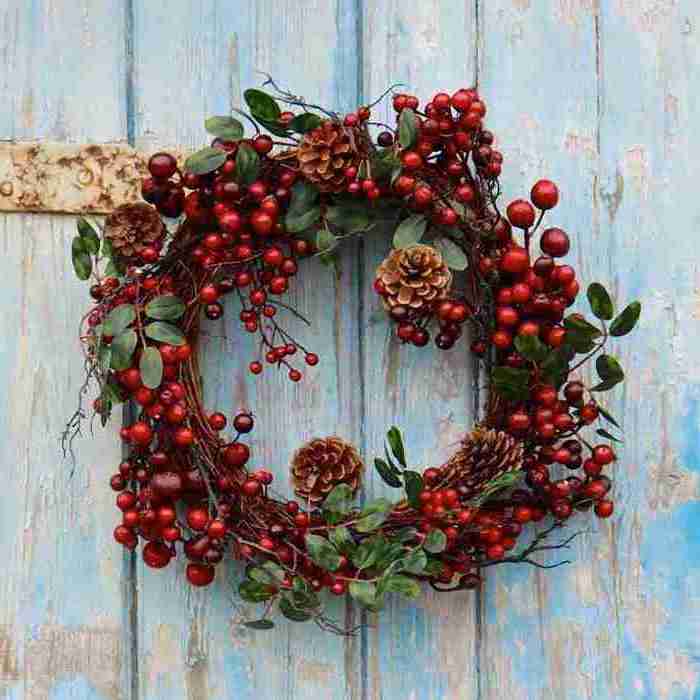
- The cones will make a cozy basket or wreath that can be hung on the front door.
- Zucchini decorated with berries and flowers will become the main character of the garden plot.
- A kaleidoscope of bright colors of pumpkins, potatoes, eggplant will decorate the yard landscape if you come up with a worthy use for them.


Advice! Looking for ideas for crafts for kindergarten, check out the wonderful houses made from bark and tree branches.


Crafts on the theme: "Sea and the underwater world"
Sea crafts give bright emotions and a rainbow mood even in cold winter. If you are lucky enough to collect a collection of shells during your vacation, hurry up to become the authors of voluminous applications, paintings, frames, a marine theater or an aquarium.
- Sea treasures are easily transformed into beads, pendants and pendants.
- Cold porcelain, salt dough will help to complement the composition with starfish, corals, colored stones.
- The ocean in a bottle is a whole underwater world that allows you to invent different stories and study marine life.
- On a cool day, warm memories of summer will also be given by boats made from improvised materials.


When making nautical-themed decor, do not limit yourself to anything - create, try, dare

In the manufacture of products on the theme of "sea" you can use absolutely any natural material

Feathers for needlework
- bird feathers- used by craftswomen to create soft pillows, warm feather beds, hat decorations, toys, unusual souvenirs.
They also decorate the interior, complementing the crafts with sequins, sparkles, small ribbon bows and other decor.


Despite the fact that the pen is a very capricious material, working with it is quite simple and easy.

Dream catcher - a magical talisman that attracts good luck


Important! Bird feathers can cause a severe allergic reaction in humans, so be careful using them as home decorations.
DIY crafts (step by step)
It is easy to create crafts from natural material with your own hands - the main thing is to get the necessary tools and material. The following step-by-step instructions for creating versatile home and garden decor will help you complete this simple task.
colorful panel
Panel - decorative, facades. Currently, three main genres are used for its manufacture: sculptural, mosaic and appliqué.
An interesting solution is an artistic panel made of natural materials: dry leaves, straw, nut shells, dried flowers. Its production takes place in 3 simple steps:
- First you need to make a base. It can be made from wooden boards knocked down into a shield or a piece of plywood.
- Next, the base must be covered with burlap material or a straw grate over it, on which the application will be applied. You can make an application from flat elements (leaves, grains, seeds), or get a relief surface by combining three-dimensional details. An unusual solution would be to weave dried citrus, moss and leaves into a straw net.
- The final stage is the creation of a rope or wire loop for attaching the panel to the wall. Rate the result in the photo!
Advice! If desired, a frame made of snags or vine branches can be added to the resulting composition. It will make your work more elegant


Egg shells for indoor plants
Creating small flowerpots from eggshells requires special care, since the shell itself is a rather fragile material and can be easily damaged by careless movement.
Procedure:
- Prick the top of a raw egg and pour the contents into a bowl.
- Finish the edges until a clean cut is obtained, or leave them chipped.
- Stabilize your vases with a stand or egg carton. Alternative options may be a plasticine flagellum that complements the bottom of the shell.
- The resulting container is ready for seedlings of wild flowers, greenery, moss, small succulents.
Interesting to know! An eggshell can also be used as an elegant candle holder, an Easter craft or a miniature flower bed.


To create your own mini-garden, you will need quite a bit of time, the main thing is to do everything carefully and follow the rules described above.


Saw candlesticks
Preparing an exclusive candlestick from a stump or saw cut wood will take a minimum of time and effort. Obtain the necessary material and tools to perform the following actions:
- Impregnate the wooden base with compounds that prevent the formation of rot and insect pests.
- Using a drill and a special nozzle, make a shallow hole in the center of the stump to install a standard candle. So that the edges do not pose a danger, process them with sandpaper.
- Decorate the product with burlap tied with a jute rope or a beautiful ribbon.
A wooden stand for 2-3 candles, made of simple driftwood, mounted on a wall, hangers or supports, will look unusual. Such an interesting hand-made product will be the best attribute for romantic evenings.


Kitchen clock
A clock for the kitchen from cutlery is made very quickly and simply. For this we need:
- clockwork with a beautiful dial;
- disposable plastic spoons and forks;
- glue gun.

Step by step master class
- First you need to disassemble the watch, separating the mechanism from the dial;
- Next, using a glue gun, we glue improvised arrows opposite each number so that the spoons and forks alternate and follow one after the other. So the watch will look much prettier;
- It remains to let the glue dry, set the dial in place and insert the battery into the watch. Original and useful ready!

Summing up
Do-it-yourself decor for home, summer cottage, school, kindergarten is easy to do, especially if you use natural material for this, which is a pleasure to work with.


You just need to enlist the help of family and friends, connect your imagination, and boldly create! Try, experiment, look for your own!
Each person has his favorite time of the year, so we decided to offer you a whole series of craft workshops on the themes: winter, spring, summer, autumn. Beautiful crafts on the theme of nature will remind you of golden autumn, snowy winter, seaside holidays or flowering plants in spring. They can be made in educational institutions at thematic classes or at home to present someone with a gift with your own hands. In this article, you will learn about wool painting, how to make unusual herbs, a beautiful souvenir from natural materials, and an original postcard from autumn leaves. Such crafts on a natural theme are easy to do with your own hands from improvised materials. So let's get started...
Painting with wool is a meticulous work that also requires certain skills. However, finished works can become an original interior decoration or a precious gift. Drawing with wool does not require brushes, paints and water, it is done by a consistent method of laying out colored wool fibers.

Painting with wool on a natural theme
Materials for painting with wool:
- photo frame with glass;
- wool or combed colored ribbon;
- tweezers;
- scissors;
- interlining.
1. We cover the base of the frame with interlining. After that, we impose strands of white wool in different directions. Lay out the strands in such a way that the ends of the wool protrude 1.5-2 cm beyond the picture. Attach the glass from the frame on top and cut the outgoing ends of the wool with scissors.

2. Using the plucking method, make woolen wool out of the combed tape. Now you need to form a background for a picture on the theme of a winter evening. Work with shades of blue and apply pieces of wool from dark to light. To assess the quality of the superimposed layers of wool on top, apply glass as often as possible.
3. Using white wool, make snowdrifts. To do this, pull out dense pieces of wool and lay them out horizontally.

4. To draw trees, you need to pull out thin dark blue strands and twist them into threads. Tree silhouettes are also decorated with white thin strands.
5. For the crown of trees, you need to pick a ball of white wool and beautifully shape it with your hands.
6. The moon can be drawn with finely twisted white wool and filled with finely chopped wool.
7. Draw a house with brown wool, and cut out the roof from white. The first time working with wool can be difficult, but while cutting, imagine that you are working with paper.
8. Close the lower part of the house with snowdrifts of white fibers.

Wool painting on the theme of winter evening
Apply glass to the picture as often as possible in order to correct imperfections in time. The finished picture must be covered with clean glass and inserted into the frame.
Spring lovers can make beautiful herbs for the home interior. Who is a herbalist? This is an animal from which ornamental grass grows if it is regularly watered. This souvenir is often made in kindergartens to decorate a green corner or to decorate a kitchen.

Herb materials:
- kapron stockings;
- sawdust;
- scissors;
- lawn grass seeds;
- paints for decoration;
- brush;
- needle with thread.
1. Cut a stocking 10 cm long, sew it from the bottom side.
2. Pour sawdust into the upper hole almost to the top.
3. Sprinkle lawn seeds where you want them to sprout. It is best to do this from above, then the greens will replace the hair in your craft.

4. After the stocking is filled, sew it on top too.
5. Now you can start forming the grass. Cut out circles from nylon stockings, stitch them along the edge, fill with sawdust and tighten. In this way, you can make a nose, ears, arms and legs.
6. Eyes and mouth can be painted with oil paints or cut out of colored paper.
Don't forget to water these souvenirs! When the grass sprouts, your crafts will come to life.
How nice it is to plunge into dreams of memories of the sea, warm sand, salt water and bright sun. We offer to make a souvenir as a keepsake of a sea holiday and a walk along the sandy shore.

Materials for a sea souvenir:
- a jar with a lid;
- woolen threads;
- scissors;
- PVA glue (you can do without it);
- salt for the bathroom;
- shells or pebbles.
1. A jar can be taken in any size, shape. A prerequisite is that it must be thoroughly washed and dried.
2. We take a woolen thread, preferably a color close to the marine theme, cut off the required length.
3. We tie shells or pebbles to one of the ends of the woolen thread. You can make holes in them if there are no natural holes in them. If making a hole is difficult, just glue or tie the threads.

4. We tie the second end of the thread around the neck of the jar. You can wind it up and then tie both ends of the thread together.
5. Now we pour salt inside the jar. Therefore, the jar must be perfectly dry so that the salt does not absorb moisture and does not become a lump. Lay the shells on the salt. If there are other items related to the sea, feel free to use them too, such as colored glass, pebbles, an anchor, or a small ship.
6. Screw the lid on well, and then decorate the jar with a shell.
This craft can be used as a bathroom decoration or as decor for a nautical themed party.
Why do people love autumn? For the colors that she bestows on each tree, for the falling leaves and the opportunity to rustle the leaves in the park. This time of the year is enjoyed not only by adults, but also by children. You can not only enjoy the autumn humid air and bright colors, but also collect a lot of materials for crafts. We offer you to see a master class of paintings on the theme of autumn.
Materials:
- two sheets of cardboard;
- scissors;
- paints;
- brushes;
- autumn foliage;
- PVA glue.
Let's start making crafts about nature autumn
1. Pick up beautiful leaves that have fallen from trees. The leaves can be from cherries, apples, pears, cherries or plums, any of those that grow near you. The main thing is that they are of different colors and shades.
2. Take a sheet of cardboard and cut out an oval inside. It turns out something like a frame. For now, let's put that aside.

3. Now let's start painting the picture with paints. On a whole sheet of cardboard at the top, draw the sky. You can just paint the surface blue, but it is better to convey the shades of the autumn sky: blue, gray and purple tones. Draw flying birds or dark clouds.
4. When the paints on the cardboard are dry, we begin to create a forest. To do this, we glue the leaves on cardboard close to each other.
5. Now we take the cardboard frame made in paragraph 2 and glue it to our blank with the sky and leaves. You should get a picture of an Autumn forest in a frame. The ends of the leaves look like the tops of autumn trees against the backdrop of a beautiful sky, and flying birds can be seen in the distance.
Autumn crafts are ready. On the reverse side, you can write warm wishes and give this picture as a postcard. Cardboard for this postcard can be taken not only white, but also colored. It is not necessary to glue whole leaves, you can make another application from the leaves and decorate it as well.
Video on the topic: Grass. How to make a do-it-yourself herb
on the theme of the seasons, it is convenient to use in school and preschool institutions for teaching children in labor lessons. They will also help parents find ideas for interesting leisure activities for the whole family. Different techniques of arts and crafts will allow diversified development not only for children, but also for adults. Besides crafts on the theme of nature will be a good reminder of the beauty of the environment at different times of the year.
Greetings to all guests and regular readers of the blog. Recently, I raised the issue of manufacturing for various competitions and exhibitions in kindergarten and school. I realized that this issue is very relevant, so I decided not to stop and devote a couple more articles on this topic.
However, today we will no longer create from an orange vegetable, but from natural materials, that is, from what can be found in the world around us. Most often, moss, bark, acorns, leaves, flowers, chestnuts, dry twigs, mushrooms, etc., that is, all plant elements, are used for children's creativity. Of the mineral, shells, sand, shells, stones are well suited.
We will needlework on a specific topic, and on which one, I think you can already guess. Of course, all products should be close to the autumn theme, because I bring the Autumn Festival to all preschool and school institutions.
Do not forget that in addition to organizing all kinds of competitions, matinees are always arranged. Therefore, it's great if you and your child not only work with your hands together, but also memorize a couple. But let's not deviate from the topic and proceed to the selection and creation of crafts.
What crafts from natural material on the theme of autumn can be done with your own hands quickly and beautifully
First, let's understand and figure out what can be done in general. Scrolling through a bunch of different sites, I selected different options for creative work. I note that all of them are still very similar to each other, but at the same time there is something unique in each work.
And here is the first piece. The so-called autumn in the forest. Take a piece of cardboard and cut a circle out of it. Decorate (glue) the imaginary earth with leaves, berries. The house can be built from sticks or paper. In the role of trees, sprigs of a Christmas tree or pine tree work well. Also use log cabins from dried thick branches. Don't forget the stones. Well, plasticine will always help you.

But what kind of house can be made from twigs and colorful autumn leaves. Near the hut, you can settle some fairy-tale hero or forest animal.

Another variation of a house made of cereals and various natural materials. Looks very nice and bright!

How do you like such cute burdock hedgehogs? Well, just a miracle. By the way, you will learn how to make such a craft a little lower, there will be a detailed master class with a description and step-by-step pictures. So do not rush to leave the page, read everything to the end.

Here's another hedgehog idea. Only here the picture acts as a product. Toddlers can easily cope with this type of activity.

As an addition to any craft, you can use a Barbie doll as the Queen of Autumn. And to make her more elegant, make her a dress out of maple leaves.

I really liked the next song. The cone animals are so cute and funny. The work is just class!

From chestnuts you can make any cartoon characters. They perfectly complement the forest clearing.

I don’t know about you, but the photo below really hooked me. So subtly convey all the mood of autumn, it's just a masterpiece.

Hedgehogs, hedgehogs! They are the most popular in crafts made from natural materials, so admire, well, do it yourself.

Forest deer, just handsome. They are made very easily and simply. Connect all the details with brown plasticine.

Another idea is that the cones can be painted and made into whatever you want. Here is the autumn composition.

Ideas for autumn crafts from natural materials for elementary school for the exhibition
In fact, such creativity is very useful, and if your child is carried away by it, then you will then have to prepare natural materials in advance and learn how to properly store them. But of course, this is another topic, today is not about that. Therefore, the following works will help you.
Option with a sailboat and a forest dweller. Simple, but tasteful.

I look, houses are also often found in products. Apparently because they look spectacular and are appropriate in any product.

Here's what I was talking about above. That various animals, fairy-tale and cartoon characters are easily made from natural materials.

What a squirrel who brought a nut. Just a cutie. And for work, you only need cones, acorns, leaves and a stand. Also plasticine.

Well, owls are real. And feathers are also part of natural materials, so do not forget about them.

Now hedgehogs are not from burdock, but from your favorite cones. It also looks great.

For schoolchildren, the following creation is great. It develops imagination, perseverance and accuracy very well.

Here are more works on the theme "Autumn in the forest." I think a lot of people would like to do this on their own.


And finally, these funny puppies who went for a walk. Bravo to their creators! Looks original.

And I want to invite you to watch the following video story. It tells in detail and shows how you can create crafts from natural materials, namely, to make a clearing with mushrooms. Great creative idea for kids.
Crafts from natural material for the autumn holiday in kindergarten
Now let's see what our kids can do. Yes, actually everything. So all the works are suitable for both schoolchildren and preschoolers. The help of adults, of course, is only welcome and will not be superfluous.
The next work is called "There was a birch in the field." We found a strong birch knot, yellow birch leaves and your tree is ready. In addition, they built a hut from branches, covered the ground with moss, laid out a path with pebbles or cereals, and everything is ready.

Here is a picture in a frame. All the same familiar materials: leaves, grass, plasticine and sunflower seeds.

And what a bright ladybug can be obtained from rowan berries. Indescribable beauty!

Do not forget that natural materials go well not only with plasticine, but also with vegetables from the garden. Such cute lamb and pig!

Well, this one is pretty simple. But how a child will be happy with such a creation of his.

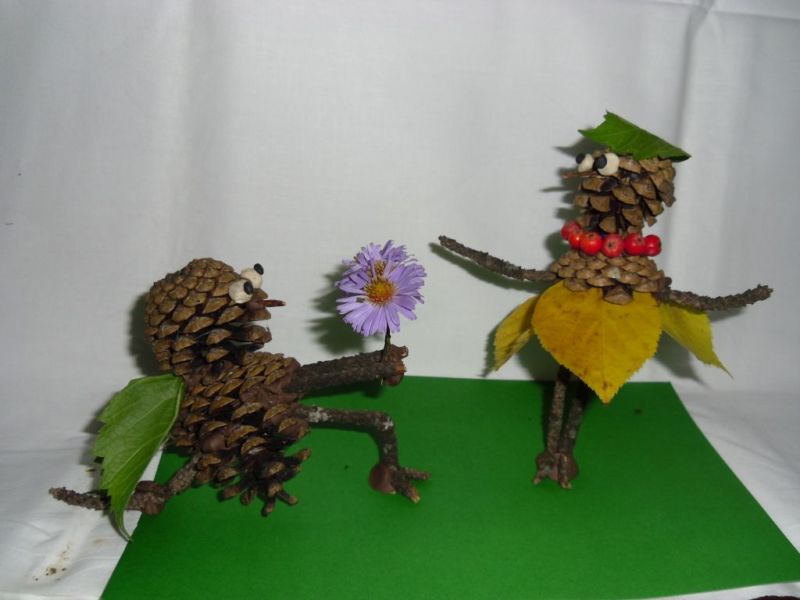
And what are these miracles? I think it's Goblin and his girlfriend. A cheerful and romantic composition turned out, do you agree with me?

Remember, a little higher it was shown closely how you can make forest deer? And now they are not separately, but in a whole composition.

Here and autumn trees look almost like real ones. And cute and prickly hedgehogs are already right there.

And another variation of making a wise owl.

I never tire of being amazed at how rich human imagination is and what our skillful hands are. I say “Bravo!” to the authors of the works.
Interesting do-it-yourself work for grades 1-3 using natural materials
Well, I still have amazing autumn works for you. If you are not tired, then read on and be sure to choose products for creativity with your children.
For example, you can make such a three-dimensional picture. And you can call it like this - Autumn bouquet in a vase.

What do we see below? Wow, a real tree and a superb bunch of leaves. Class!

Oh, I can’t stop, I found another chestnut hut. We have a lot of them in Tula.

And here is a hedgehog without a head and legs). So big and with crops on thorns.

And how beautifully you can decorate a basket from moss and berries! Moreover, the basket itself can also be independently weaved from twigs.

If time permits and there is a forest near you, then wander through it in search of interesting materials for work. You will definitely be lucky and you will find something special, for example, as in the picture below.

By the way, from autumn leaves you can create bouquets of roses. Looks very nice.

Here is another work dedicated to the theme of autumn in the forest. Beauty, what more can I say.

Dancers girls from leaves, acorns and twigs. Original, original!

And here is just a bouquet of roses from the leaves. Just twist the leaves that have not yet dried and the buds will be ready.

Original crafts made from natural materials and plasticine on the theme of golden autumn
Now I propose to look at the options for products with the inclusion of plasticine. I will not describe in detail what and how, because from the photographs everything is clear and understandable. There will be questions, then write in the comments, I will answer.
- "Caterpillar";

- "We collect mushrooms";

- "Forest animals";

- "Walk in the forest";

- "Visiting Baba Yaga";

- "Puppy";

- "Funny snails";

- "Beasts";


- "Butterfly";

- Insects";

- "Life in the forest";

- "Mushrooms".

Step-by-step master classes for making autumn crafts "Hedgehog", "Cockerel" and "Owl"
Well, as promised above, I will tell and show in detail how you can make the most popular crafts from natural materials. Ready?! Then let's start!
Hedgehogs from burdock in the autumn meadow

You will need: leaves, twigs, cones, tree mushrooms, burdock, plasticine, sticks, any box, scissors, PVA glue, hawthorn berries, mountain ash or any others.
Work process:
1. To make a clearing, we need a piece of cardboard. Take any box and cut out the required size of cardboard.

2. Draw a forest edge on the cardboard. Glue the leaf, cones, berries and tree mushrooms. And in order for the branches to stand, fix them with plasticine.

3. From yellow plasticine, mold a head for a hedgehog. And from black make eyes and a nose.

4. Insert a non-fragile stick into the plasticine head.

5. Now form a body with thorns from the burdock.

6. As a result, you should get such a hedgehog. Do not forget to stick a piece of plasticine on the end of the stick, otherwise the muzzle will outweigh.

7. Put a couple of berries on top of the thorns.

8. Make another hedgehog and put them in an autumn clearing. Your craft is ready.

Cockerel from cones

You will need: pine cones (large and small), plasticine, scissors, autumn leaves, rowan berries.

Work process:
1. Take two small dense leaves, preferably with the greatest predominance of red. Cut them into narrow strips, as shown in the photo. Cherry leaves work very well for this.

2. Attach the resulting leaves to a large cone (torso) using small pieces of plasticine.

3. Now make a long and bright tail. To do this, use the technology described in paragraph 1. Take yellow, green and red leaves. Rowan, ash and grape leaves are well suited. Fasten the blanks with a piece of red plasticine.

4. Attach the tail to the top of the pine cone.

5. Make a stand for the cockerel from green plasticine. Decorate the stand with rowan berries.

6. Attach the torso to the stand.

7. Now make the head. Take a small bump. And make a beak, comb, long earrings from red plasticine. Roll up round eyes from black plasticine. Fasten everything to the bump.

8. Blind the neck from orange plasticine. And take one leaf and also cut it into strips.

9. Attach the neck to the body, and then fasten the head to the neck. Stick a cut leaf to your neck.

10. Finally, place the cockerel on a hard surface and decorate its place with any autumn natural materials.
And for a snack, an owl-owl. The craft is made from dry leaves and a transparent bag. Everything is very, very simple. The result exceeds all expectations. So rather watch the video and do everything according to the model.
And since I can't stop, get some more cute ideas.
Chanterelle-sister from carrots. And her clearing is made of various natural materials.

Smeshariki also visited autumn. There is a fantasy - there is a result.

Another family of mushrooms. Twigs can be taken brown, and then just paint them with white paint.

And here is a hedgehog who found a ripe apple. There is a plot, which means the craft is ready.

Well, the invented forest dweller will decorate any work.

Well, now that’s all, I must stop, otherwise I won’t finish writing like that). Finally, I note that all the collected works are not mine, but taken from the Internet. So once again I will praise all the authors - “well done”, the crafts are all cool and for any age and taste. And I wish you, dear readers, to work hard and win prizes at exhibitions. Let your children receive their first diplomas and awards. All for now, for now.
Hello everyone!
I welcome you to the pages of the ShkolaLa blog! It's autumn outside. And what kind of "School" in the fall and without autumn crafts? That's right, none) Children bring all kinds of crafts made from natural materials to school every year, around September - October. That is, right now! Therefore, right now an article dedicated to these crafts is being published on the blog.
Most of the works that you will see below were found by me on the Internet. I want to send a big hello to their authors and say thank you for their great creativity and wonderful ideas, which, I hope, will inspire many young schoolchildren and their parents to their craft exploits.
Lesson plan:
From chestnuts
A huge chestnut grows right in front of our entrance. And when you leave the house in the morning, no, no, and you will get a chestnut on your head. It doesn’t hurt at all, it just happens unexpectedly) So we don’t have to go far for chestnuts, they literally fall from the sky.

Last year, with our own hands, we made such “Checkers-Insects” from chestnuts, which we then presented to the kindergarten as a keepsake.

The tutorial for making this game is hidden away.
And from chestnuts you can make such amazing snails. A very easy craft that does not require much time.

Charming and not at all scary spider. True, making a hole in a chestnut can be problematic. Here the child will probably need the help of one of the adults.

If you add plasticine and a little imagination, you can make the whole of Africa!

Or a poultry yard.

And this caterpillar is just a feast for the eyes!

I am sure that she could decorate with herself more than one exhibition and win in some autumn competition.
From cones
And for cones, the children and I go with a basket to Victory Park. But there you can only collect pine cones.


The playing field is made of branches, and the chips themselves are made of pebbles, but they can also be built from chestnuts, and even from halves of walnut shells.
From leaves, flowers, berries
Something, but there are a lot of beautiful bright leaves in autumn. Collect - I do not want. However, like berries, mountain ash, for example.

I remember when Sasha went to first grade, it was still in another life (before the blog), we made roses from autumn leaves for school. We didn't succeed, we tried many times. As a result, they succeeded. It turned out like this.

From leaves and flowers, you can make various applications.


Use them together with other natural materials.

And you can try to create a real work of art.

Rowan berries are perfect for making jewelry, beads, for example.

From something strange
And walking through the autumn parks and streets, you can find something strange and, at first glance, completely unsuitable for crafts. For example, here is a piece of birch. How to call it then? Spit, right?

We found it and took it with us. Brought home. Washed, dried. And they decided to turn it ... into a watermelon! Very much the right shape. See what we got.

We needed:
- Birch;
- acrylic paints (white, green, black, red);
- brushes;
- acrylic lacquer;
- PVA glue;
- plasticine.

First, our entire future watermelon was primed with PVA glue.

Then they painted the "crust" in dark green.

And they drew a dark strip in the middle.

"Watermelon pulp" was first covered with white paint.

And then, slightly retreating from the crust, so that a white rim remains, they painted everything in red juicy color.

To make the transition from white to red smoother, a pink stripe was added between them. When our watermelon dried up, we varnished it. After that, he became even juicier.
Only the bones are missing! We molded them from black plasticine and glued them into place.

Now this birch watermelon stands in our room in the most prominent place and pleases us and our guests, who strive to touch this piece of summer.
That's how many different crafts you can think of and do for an elementary school with your golden hands. Nothing complicated, but how exciting!
And right now, the singing kids will share with you their wonderful golden autumn mood)
And what have you already managed to build from natural materials this fall? Tell me? Waiting for comments)
Enjoy your creativity!
Yours, Evgenia Klimkovich.